Showing posts with label student blog. Show all posts

03/02/2018

ILLUSTRATION: Shiran Abergil x Efrat Cassouto

 Just thought I'd share my newest illustrations with you guys...

So I recently discovered a new designer through the muddle of Instagram. Through this discovery I also found a fantastic jewellery designer and a model I was unfamiliar with - all from one picture! ... aah the joys of Insta..

Anyway I haven't been able to shake this picture out of my head; I knew I needed to buy the earrings or illustrate the picture. Needless to say, I opted for the latter...


30/01/2018

FASHION IN FOCUS: Tommy Hilfiger x Gigi Hadid

Who hasn't been on the Gigi train this last 2 years? I feel like at this point, regardless of whether you like her or not, you have to just admit - she is killing it! Everywhere you go; pop in your local drugstore, Gigi...Pick up a magazine? Gigi. Instagram - Gigi. Gigi Hadid is killing it.

Now, as far as Tommy Hilfiger goes...if anyone knows me you'll know that I don't necessarily fit the image of T Hilfiger's demographic. However, that being said, I feel absolutely enamored with this new collaboration and truth be told, I kinda want the clothes too. The first picture I've popped on this post (featuring a close-up of the gorgeous Gigi) consists of one of the key items from the Spring  collection. My favourite thing about the grey sweatshirt is the half zip that features the gold ring pull which is just such a fantastic addition. The metallic gold really gives the piece of athleisure wear a luxury touch. The one thing however, that sells this to me is the combination of navy, white and that signature red stripes. *Sigh* Aah...one day hopefully...


For more TOMMY HILFIGER

18/03/2016

CREATIVE SPOTLIGHT: Christine Kobzeff

Following on from my previous post, there's a creative individual, a youtuber I discovered early last year who provided inspiration for my terrarium gardens and many, many more. To me, she is the epitome of the term perfectionist, always paying extra attention to finishes and perfected corners. Initially having discovered Christine Kobzeff when I realised that Youtube featured home DIYS, her projects have evolved beyond homeware; often featuring gardening and beauty.

I've linked some of my favourite videos of hers below, if you're into DIY/homeware definitely give her a watch! Thank me later...

DIY Succulent & Cactus Potting Soil
Click here to watch

DIY Desk + Home Office Decor Ideas
Click here to watch

DIY Bohemian Room Decor Ideas
Click here to watch

DIY Mini Cactus Gardens
Click here to watch

5 DIY Decor Ideas For Succulents
Click here to watch


All images courtesy of Youtube
Christine Kobzeff's 'Pinksofoxy' Youtube channel
Christine's 'Modern Bohemian Lifestyle' Blog
@christinekobzeff's Instagram


09/03/2016

DIY: Terrarium Garden

Absolutely head over heels for this new trend! 

Lately I've been seeing these around, a recurring trend I've been wanting to recreate with a friendlier price tag. Something about using a terrarium as a planter seems really contemporary; the simplicity and minimalist style included. 

So after finding these absolute bargains - initially the hexagonal terrarium, I decided simply after a glance at the price tag, that I would purchase it. Having no idea for a purpose suited for the glassware, I chose to buy it for its aesthetic value. The bigger terrarium features multiple succulents, place of purchase ranging from Flourish (Manchester), B&Q (Manchester Fort) and Ikea (Ashton-Under-Lyne)

For ideas on potting and re-potting succulents and cactus, check out Christine Kobzeff. 

Large terrarium - TKMaxx, (no longer available) £12.99
Hexagonal terrarium - £7.99 TKMaxx  (no longer available) - Similar shape available at Urban Outfitters, see below.

Not On The High Street £32.50
Link here
Marks & Spencers £29.50
Link here
Urban Outfitters £40
Link here
Etsy £28.88
Link here
Not On The High Street £42.50
Link here
Not on The High Street £40.50
Link here
Urban Outfitters £30
Link here
Not On The High Street £40.50
Link here
The Worm That Turned £64.95
Link here

Urban Outfitters £30
Link here
Admittedly, the terrariums featured above are much pricier than the ones I purchased, however, there are much, much more variety in terms of metal and colour. But just to be sure, pop in to Tk Maxx or Homesense first for a better deal.

Alternatively, it could be a potential DIY?

1) KatherineElizabeth
    Link here
2) TheSorryGirls
    Link here
3)JENerationDIY
    Link here


11/12/2015

CREATIVE SPOTLIGHT: Pinodesk

A loose wash of watercolour is what creates the distinct style of this artist; one whose work I've been following for over a year. The portfolio ranges from prints to custom illustrations; all of which carry the signature style of Annalisa Ravelli. I particularly enjoy the work of this illustrator because of her loose style of painting which, personally is a technique I find hard to achieve. As an illustrator myself, I tend to lean towards images of high contrasts and sharp lines, however, I appreciate the control of limiting yourself to muted-down colours which I think this artist is capable of.


BE COOL,fashion illustration print
'Be Cool'
'Shut Up And Kiss Me'


Entitled 'Hello Loubies', this illustration is a testament to all things feminine; Christian Louboutin footwear.

'The Drew' and 'Cherry Red Celine'


18/10/2015

BOOK RECOMMENDATION: Why you?

Image courtesy of www.amazon.co.uk

So as a recent graduate, job-searching has become a daily routine and although the application process itself can be deemed quite tedious, I must admit I enjoy the interview process. Playing dress up, shaking hands, selling yourself can be quite daunting but admittedly it's easily becoming increasingly enjoyable!

This book, I discovered nestled between several business magazines and leaflets prior to an interview. I vaguely recalled a piece of advice I had been given previously; 'The minute you walk into the building, you are being judged.' So, in an attempt to not appear idle, I picked up this book. In all honesty, I'm not entirely sure what prompted me to go for this one but there is
something incredibly persuasive about the title.

Recruitment boss James Reed gives a professional guide to an interview with a personable voice. An easy read with some incredibly useful tips and tricks that enables an open-minded approach for those scary interviews.


" One moment 

Can the path of person's entire life come down to what they do in just one or two decisive moments. The guitarist Andy Summers certainly thinks so. 
          You might not recognise Summers' name but you'll know his work. Summers was one-third of The Police, one of the most successful rock bands of all time.
          Maybe you're not a fan, but you would have to agree that Summers, in being a guitarist in a rock band, landed a job that many of us would love to have. His job took him to almost every country in the world. He did creative things all day. He met interesting people and devoted fans. He was paid a ton of money for doing something he loved, something that came naturally to him. Truly, great work if you can get it. So how did he get it?
          He got it by boarding a London Tube train and sitting down at random next to a drummer named Stewart Copeland. People don't usually talk on the Tube, but for some reason those two struck up a conversation that day. It was a conversation in which they told each other what kind of music they wanted to make. Each convinced the other that he was sincere and suitable. They clicked. They formed a band. They met Sting. They went to work.
          Take out that last bit about Sting and you've got a perfect description of what happens at a good job interview: two people talking from the heart about a common interest, each setting out what they have to offer."

And from that opening statement, I was hooked! What a brilliant, brilliant book!

Book: Why You? 101 interview questions you'll never fear again
Author: James Reed
Publisher: Portfolio Penguin
Published: 1st January 2015

Disclaimer: Content in lilac is a direct quotation from the book mentioned. I do not claim ownership for this or any other piece of literature mentioned on this blog, I am simply using them as objects of reference.

14/03/2014

ILLUSTRATION: Dolce and Gabbana using Make-up!

Hello all! Another Dolce and Gabbana (Autumn/Winter) inspired illustration hot off the press!Absolutely loving this collection lately and just can't seem to help myself to not be inspired by the intricate jewellery, delicate lace and flawless make-up. So with that in mind, I thought I would use cosmetics as the media on white watercolour paper, and the results aren't too bad - even if I do say so myself!

This was probably one of the most fun illustrations I have produced in a while - and what felt like one of the freest. Perhaps because I wasn't expecting much from this new media or perhaps just because I was experimenting but one I definitely wouldn't mind trying again. This was part of my 'Visual Studies' module as one of the sample pieces in an Illustration project and although the media wasn't the one I stuck with, it was one of the better ones.

So to create this illustration, I used a selection of cosmetics ( - all while being careful as to not use anything pricey and yet use products that have the right consistency/pigmentation/application etc... ), after having roughly mapped out the face and proportions with pencils - as always.

The products used are as follows:
1) Sleek nail varnish: Coffee, Tea or Me
2) Rimmel nail varnish: Caramel Cupcake
3) Gosh quattro eye shadow: 32 Evergreen
4) Sleek pout paint: 160 Pinkini
5) Barry M waterproof eyeliner: Bold Silver
6) Sleek face form palette: Medium 374
7) MUA extreme eyeliner - Black
8) Sleek eye palette: Oh So Special 658
9) GOSH the ultimate eyeliner - with a twist - Raw Grey
10) Barry M nail varnish - Gold Glitter 339
11) Active Cosmetics eye palette ---
12) Barry M nail varnish - Pink Iridescent 264
13) Maybelline Super Stay nail varnish - Divine Wine 265
14) Revlon nail varnish: 025 Plum Night
15) Colour Club green nail varnish -----

All products applied using a selection of Real Techniques brushes.
Time taken: 4 hours approx.


09/03/2014

FASHION STUDENT: I'm on Pinterest!

Lately my illustrations have been heavily based (-however loose that may be) on the Dolce and Gabbana Autumn/Winter 2013/14 collection. 'Why?' you ask? Because I love it! Black and red lace. Classically gorgeous make-up. Crowns AND crucifixes? What's not to love?!

DISCLAIMER:: I DO NOT OWN THESE IMAGES.
So if you want to see a lot more from this collection (-not to mention a selection of insanely beautiful images ranging from Fashion to Beauty to everything in between), feel free to visit my Pinterest or search for Sheena Sreekeessoon on the site! Please and Thank you!


07/03/2014

ILLUSTRATION: Feast your eyes...

Just a quick blog-post to say Hi! So this is just one of my latest illustrations - a really fun one using different media! As this is part of the illustration project I have just completed, I did try to experiment using different medias...


From top to bottom...

Cara Delevingne
Image: Cannes for The Great Gatsby premiere
Media: Watercolour, water soluble pencils and chalk pen
Time taken: 2 hours approx

Daphne Groeneveld
Image: Self Service S/S 2012 Cover
Media: Letraset promarkers, gel pen
Time taken: 2.5 hours approx

Lindsey Wixson
Image: Balenciaga Spring 2011
Media: Pencils
Time taken: 3 hours approx


07/01/2014

ILLUSTRATION: My little piece of luxury...

Being an Instagram addict that I am now, I couldn't help but notice that designer items (often with a luxurious look or price tag) have become the subject of many illustrators' artwork. Even though I don't particularly understand the reasoning behind it, I decided I should give it a chance...

The 'item of luxury' I decided to illustrate - disregarding the fact that it may be the ONLY item of this nature in my possession - is the gorgeously glamorous Rouge Volupte Shine lipstick (5 - Fuchsia in Excess). Having made this purchase based simply on impulse right after my first student loan payment of this year, I hadn't even had a second wear of it before I decided that I was going to follow the footsteps of these Instagram illustrators who I admire so much. 

This was actually my third attempt (-the first being with watercolour before I realised that the paintings resembled those of a toddler's) and despite everything and how uninspiring I thought these were, I quite enjoyed this.


Overall I quite pleased with the final product, (looking back I'd change the odd little lines and squiggles here and there), I think I may have overdone it with the use of the high contrast but I never seem to be satisfied until there is a huge gap between black and white. 

Media Used: Promarkers, Watercolour pencils, Copic markers, Chalk, Gel pen
Time taken: 5 hours (approx)
Date: November/December 2013

23/10/2013

UNFINISHED: Illustrations

A few of my unfinished promarker illustrations...


 Media: Promarkers
Inspiration: Fashion print ads, street styles
Date: June - August 2013


23/08/2013

ILLUSTRATION: FahadBoutique

Quite recently, I had joined Instagram...which admittedly for me was a big deal. Considering I had managed the majority of my teenage life void of any social networks, this was quite a breakthrough for me. 

But like most aspiring artists/designers/illustrators/creators your main goal is to get your work out there, whether it's for an approval or to convey a message or create a feeling - but bottom line - that's pretty much what we all want. As much as I try to deny the obsession with this newfound guilty pleasure of mine, I caught myself wanting to check the news feed every couple of minutes - seconds, even. And as much I hate to admit, my heart did soar a little every time someone tapped on that little heart icon...


One of the obsessions with all these "likes" and "thumbs-ups" are the advantages of checking on who in fact did like your image, because, well - let's face it, we want to know the who, what and why behind that single "like". Which gets me to right about here - where I had the pleasure of being introduced to fahadboutique, a Kuwait-based haute-couture clothing line.

Browsing the images as a sort of archive, I was torn; I either fell in love with the dress or the model...or perhaps the dress on the model. I couldn't decide whether I wanted to wear the dress or be the model wearing the dress. Either way, I figured that if I couldn't wear it, I would draw it. But of course, when it's not your own design, you kinda have to get a license/an agreement or something to give you (the illustrator) the rights..to, you know...illustrate. Thankfully, all I had to do was ask, which in return got me the thumbs up and I was good to go!


Part of my little dorky heart couldn't help but feel absolutely ecstatic and 'all grown up' as though I was a "real" fashion illustrator, and the other part was just hoping that this would be the start of many more to come. Having posted the finished image up on my Instagram, I remember feeling very, very, VERRRYYY nervous - whether the designer would like it, whether it was true to the garment or brand, whether it did the dress justice. And for those of you (the two readers I have) wondering what happened...Fahad, the designer himself chose to publish it and thought it was a beautifully done illustration. Needless to say I had an ear-to-ear grin for a whole week!

22/08/2013

QUOTE OF THE DAY: 22/08/2013


18/08/2013

MODEL OF THE MOMENT: Lindsey Wixson

Being a student on a course that requires 100% of its marking from coursework means having to do a lot of work which, needless to say, usually requires:
A) High caffeine tolerance
B) Sleepless nights
C) Dedication which can only result in aching hands and bloodshot eyes.

Being a student on a fashion course, however, is a little different...and in addition to the above you will need:
A) An insane collection of fashion magazines
B) An endless supply of drawing equipment/painting materials/fabric and trims
C) High tolerance for people constantly calling you thick (whether that's directly or simply implied or just assumed - that's irrelevant)


Being a fashion student, I found that even in my new flat, I have accumulated a few too many Vogues than the tiny space allows. Whilst debating to myself whether or not to keep the magazines, I began to flick through them in an attempt to help me decide. 
One model in particular caught my eye as she popped up in quite a few campaigns - everything from Versace to Miu Miu to Mulberry. And what absolutely just attracted me to her was her beautifully unusual face - something which, today I think would be more common in beauty shots rather than anything else. And as though to apply emphasis on that, she has also appeared in the Voguebeauty section of the magazine.

I recall first seeing this model in a youtube make-up tutorial by Lisa Eldridge - a video from 2011 and I had just fallen in love with her face from then on. So with that and the dilemma of what to do with my old Vogues, I decided that I would do something useful. And in order to prove to myself that the fashion magazines still deserved the shrine they held in my newly rented room, I would create inspiration boards (as shown in the photograph above) that would - as the name suggests - inspire me to create more adequate pieces of work.                              

I don't know about anyone else but before unleashing myself in a project like this, I always like to 'test the waters' - usually preferring to start small...hence the pencil drawing (image on the right hand side). I realise this may sound silly as the word 'project' may be being used too loosely considering I had originally set this task up for myself. However, I always find that for me, to ease into new media or new styles, I always have to treat a project as though I want to be able to use as many different media as I can, create different styles and looks and feels and experiment with every variant possible to ensure that I can perform at my best. 


This drawing (as shown on the image above) has become one of my most preferred method of illustration. I have found that as I begin to work more with coloured/toned paper that I am growing more and more confident with it, and even - dare I say it - increasingly better. As a child, you're expected to learn to draw by using lines. Growing up, you realise that the lines you have been drawing for a decade or so, were merely representations of shadows, hence the combination of HB pencils and white paper. Only when you're fully emerged into the world of art do you ever begin to give a crap about the negative space in a piece of work.

I had always considered myself a dedicated Art student, however, I have to admit that even to this day, portraying light in a painting/drawing is one of the hardest things to do. Especially when all you're given is a dark canvas and white media. Even thought I hesitate to admit, the idea of that is scary enough and that box shall remain empty in my tick-list for a long time, but is one that I hope to cross off some day.

All things aside, I do think that I did a pretty bad job with the proportions considering I had used a grid for measurements. However, as a stand-alone image, I don't think it's all that bad. I think the use of the strong contrast works well; I like the look of the subtle hints of colour - particularly in the eyes and mouth and I do like the way the light has been captured in a way to create a dewy and healthy look on the skin.


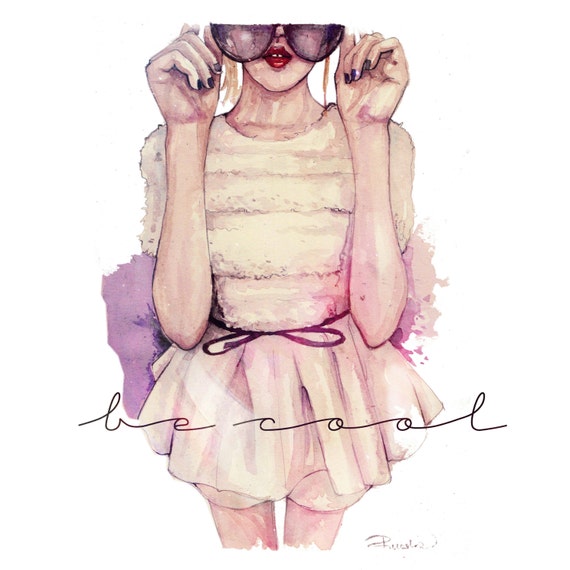
In comparison to all the other pieces in this post, (so far and yet to come), this was one of the quickest, free-est form of mark-making for me (image shown above). To emphasise that point alone, I'd like to point out that, this piece was done on the cardboard backing of an old sketchbook. And from that experience, next time I decide to use cardboard scraps, I think I would stick to mediums such as paint and inks rather than promarkers as it is absolute hell to blend.

And even though, (as mentioned in my old posts), I have been trying to steer away from cartoon-like illustrations, I feel like it turned out quite differently compared to anything else I have done previously. I feel this piece may just give this long, arguably boring post (that I am currently typing up), an element of fun and that pop of life it needs to make it somewhat enjoyable.

This painting (shown on the images on the right and below) is one of the pieces I am still content with. Usually I find that if I am happy with an illustration after having completed it, it will take me a week or two to gather up a list of improvements that could have been made...which in return voids my entire sense of achievement. However, a couple of weeks have passed now and I find that, although I have my list of possible improvements and mistakes, I am also still happy with what I produced.


Needless to say my Vogues are still intact and still remain on their shrine and I have yet to find a reason to stop clinging on to them. It's absolutely amazing how images from collections from seasons and years ago - from names you had never even heard of or just completely forgot about -  provided they are good enough - and strong enough, never fail to generate ideas and provide inspirations.


20/06/2013

ILLUSTRATION: Changing it up...

As the academic year comes to a close and I'm having time to just do nothing, I have been stumbling upon bits in my room, I didn't even realise I had - mainly work/drawings I forgot I had done... Looking through all of them, I started feeling slightly frustrated as they all looked quite different. One of the main things I like looking at in people's work are the details (or sometimes lack of) that create that distinct look and style. I have always felt that is important because as artists or designers or 'creators' we don't need to be known for our words or what we do in our spare time or what we look like! Often we are recognised by the work we do - whether the recognition is from a classmate, teacher or someone who you've never even met! And that alone is the an achievement on its own - and I'm finding that, for me, I want to come up with a style that's recognisable and truly just mine...

One of the things I struggle with is the fact that my designs are very childish - often resembling cartoon characters. Even with that in mind, I always start off thinking of a darker image, a darker, more Gothic feel that I would want the drawings to have and I think it's always appropriate for Autumn/Winter collections. However, despite that train of thought, I always just lose the feel about 15 minutes in when I realise I've added too much colour, or the eyelashes look too fake to even pass as falsies or just anything that stops me from reaching that goal! So instead of kicking myself up the arse, I'm setting myself a goal to produce as many illustrations as I can (I'm thinking mainly faces) - or as many as it takes for me to produce a piece that I'm happy with.


The first image is the original, produced on a canvas. 
Media used: watercolour only. 
Time taken: 2 hours approx

I tried experimenting by accentuating features I usually don't, using a heavier hand with the brush and sticking to very few colours. I think it looks okay, yet lacks something - something which I'm not sure of... However, the three images below are edited (I use the term edited very loosely as the most basic of all basics have been used to render these...with the help of good old Microsoft Powerpoint!) and I think they all have something that the original doesn't which give it that little something extra...

1:I love the simplicity of the rendered image on the left; the lack of colours give the face a whole different feel. I think that the contrast between light and dark is effective, usually this emphasizes a look; brings it more contrast, often making the image feel darker. However, here I think it creates a feel of innocence. The vast contrast looks as though the image was drawn on using an inky pen on plain, white paper.

2: I absolutely hate how hours upon hours spent on a piece of art doesn't give you what you aimed for, and yet with a simple click of a button, the image is suddenly transformed! Once again, I had the hope for a darker, more Gothic illustration, and somehow managed to add more colour. I do like this edited version though, as it shows me what I aim for and how the same piece that I have done would look like if it had been done differently. 

3: Although this isn't something I would do - one of the main reason being that I wouldn't want to get bollocked by the tutor in front of half my class, I still think it's a cool effect. It might come in handy for a themed collection; something more stylised, or something more exaggerated.